The design process can also be referred to as design methodology. It basically refers to a number of steps that a design can be broken down to from the initial idea or client request to the final printed end piece or manufactured prototype.
There are several trends to create a streamlined step-by-step approach, but it is not chiseled in stone. You can look at my preferred method and modify it for your needs.
I have based mine on my practice, research and education and it is working well for me. A great source of inspiration was the Double Diamond or the 4Ds developed by the British Design Council. The 4Ds stand for discover, define, develop and deliver.
The design process below is particularly suitable to communication design, but works for other design disciplines as well.
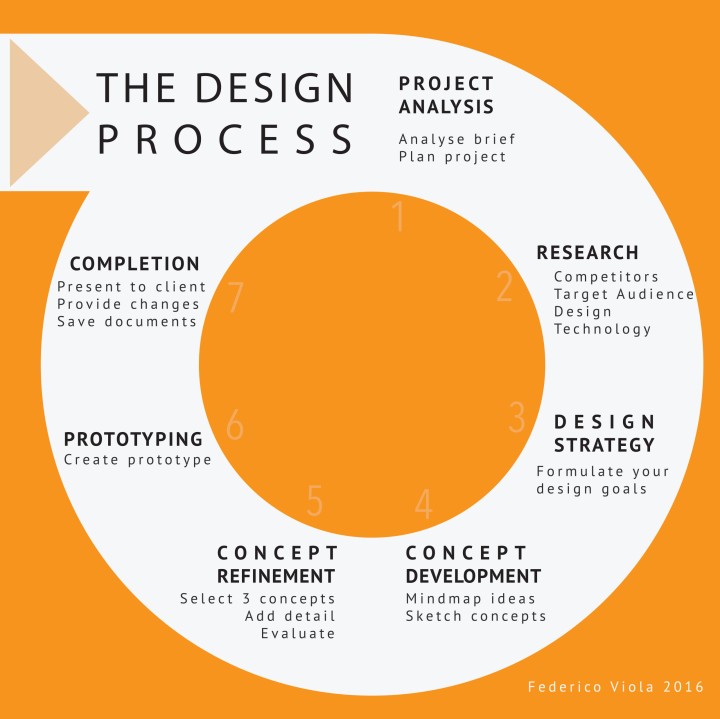
Here are the 7 steps:
- Project Analysis or Project Considerations
- Research
- Design Strategy
- Concept Development with Evaluation
- Concept Refinement with Evaluation
- Prototyping or Modelmaking
- Delivery and Completion
-
Project Analysis or Project Considerations
The first step is to define the problem or the request for a design. Either you are approached by a client or alternatively you may get your hands on a brief through a competition or by your teacher.
- Your first step has to be to analyse what the client needs and define a written brief. So, you need to write a short description that lists, what is required, what materials are needed, who it is for and by when it is needed. So, list the problem and what you need to design as well as dead lines or due dates.
- Next you need to create a project plan or action plan. This is a list of each task, with a task description, allocation (who will do the task), due date and a tick box. The allocation column is not necessary if you work on your own and complete all the tasks on by yourself.
- You should also include a section on potential problems in this project. This could be a mind map and it should allow you to see any complications early. An example could be the stability of a desk based yearly calendar, or the wear and tear of an exterior.
-
Research
Competitor Research
After establishing what product (or service) you are designing for your client, find 3 or more competitors that offer the same or a similar product or service. It is good to look at a market leader as well as competitors at a similar level to your client. This can start of as a brain storm of all competitors that come to your mind or a search of similar businesses online. You may want to find competitors via an online business directory, e.g.: www.truelocal.com.au or by using Google. If you are not aware of many online business directories try a Google search for ‘business directory’.
You can document your brainstorm in form of a mind map and your research in form of a page including:
- short description of the competitor
- images of their products
- logo of the competitor or product
- other aspects of their visual identity (e.g.:colours, fonts, etc.)

Target Audience Research
When you are setting out to understand and define a target audience you are looking to recognise why this group or individual person is seeking out your client’s product or services. By understanding a target audience you understand their needs, desires and interests in a particular product. This is central in designing a product or service. We are trying to understand a target audience by looking at data of that group. These are typical criteria to collect data by:
- demographic (measurable data: age, income, gender, culture, language)
- psychographic (personality-related data: life style choices, hobbies, interests, political agenda, cultural traits)
- customer needs
- customer desires
- frequency of use
- geographic location
Below you will be introduced to different tools you can use to collect data:
- mind mapping – a good starting point, mind map the various aspects of the target audience
- target audience list – filling in a list of criteria related to the target audience
- moodboard or visual board – this is fun: put everything related on a sheet of paper or into a digital presentation
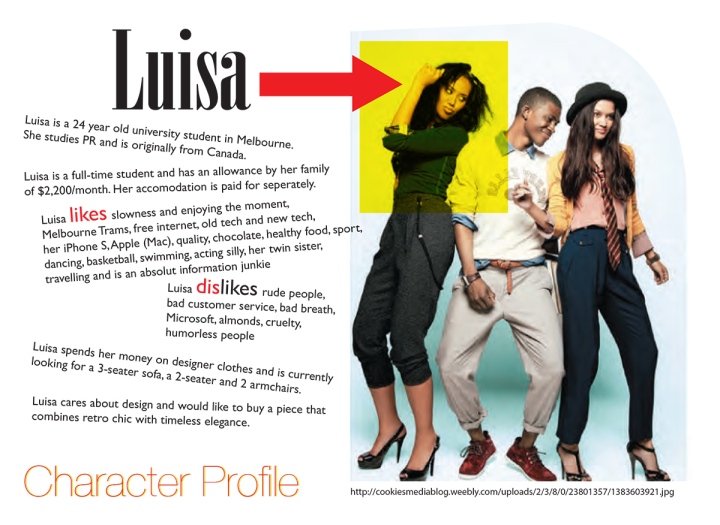
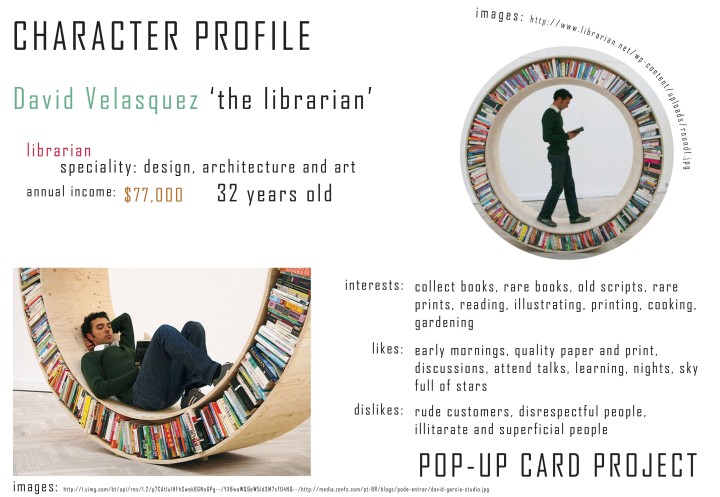
- character profile – this needs to be representative of a typical person in the target audience, preferably a common personality or a leader, see examples below
Finding information about a target audience might mean to actually listen in on your target audience. You can create specific discussion groups with participants of the correct demographic (age, gender, etc.) and psychographic (interests, political persuasion, etc.) profile. You can search online for chat forums or in the comments to related blogs and Facebook is a powerful resource as well.
Design and Technology Research
Design research is the fun part of our research and is where we want to look at inspiration for our design. This can be
- existing products of the type we are about to design as well as
- layouts
- typefaces (fonts) > http://www.dafont.com
- colours suitable to the target audience, product and client business
- textures
- shapes
The technology aspect relates to manufacturing, finishing or prototyping methods used for the product you are designing. It is central to understand the process and materials applied in the making of the product. If you are working on a plastic component to be inserted into a dashboard of a car or yacht you may need to research the plastic manufacturing process (e.g.: injection molding). While if you are designing a pamphlet, you will need to research printing and folding techniques. So ensure to research:
- manufacturing and other technology
- materials
- other aspects
I like to use Pinterest in my research and highly recommend it as it is a fun site.
-
Design Strategy
A design strategy is a written statement that will help you establish what you are setting out to design. It is your chance to reflect on your analysis and research and now clearly state what your intended design strategy will be. Make sure to relate your strategy to your design ideas and link it to your research and brief.
Example: ‘I will set out to design a poster for the MUFF (Melbourne Underground Film Festival). I will use vector graphics to show a group of festival goers waiting in a lobby. They will all look eclectic and wear some retro-style clothes. The font needs to work with the MUFF logo. The poster will have a retro appeal, but look contemporary. I want to avoid designing a poster that looks dated. The layout will have a clear visual hierarchy and good use of white space. The colour scheme needs to be decided.’
You see that the design strategy is a method to plan your design, but needs to link your ideas to the brief and research. Your design strategy may be a work in progress and you may not conclude every aspect. It is a bit a cooking recipe for a design. Incorporate problems or difficulties with this project as you may have found in your Project Analysis.
-
Concept Development
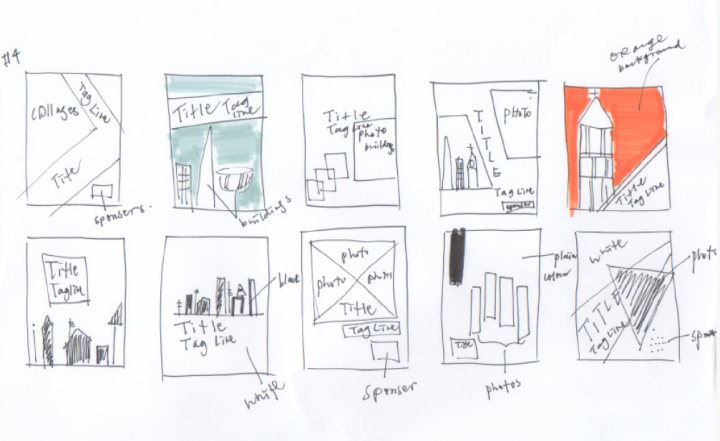
Now you can get creative by developing concepts or ideas. The preferred method is the sketching of thumbnails on paper. Use pencils or fine liners to sketch out your concepts. You need to create a large number of ideas. Do not limit yourself to only your first few ideas, but use brainstorming, mind mapping and other creative thinking tools to come up with creative and unorthodox concepts. I would develop a minimum of 30 thumbnail sketches.
-
Concept Refinement with Evaluation
Select 3 of the most suitable and promising concepts. You may select them yourself or get the feedback of a colleague or the client. Refine the concepts by exploring variations for layout, fonts, scale, colours and shades, as well as image choices and finishes. Always include a colour scheme (options of colours) and font choices.
- Depending on the product you may create 3 mockups to give a feel for the product.
- Present your 3 refined concepts to your design team and client for evaluation and feedback. Choose the preferred concept.
- You may create a style guide that clearly defines the different aspects of this design (font choices for headers, base text, colour choices, and more)
The evaluation takes your design strategy into account and looks at how well each design has achieved the desired aspects.
-
Prototype or Modelmaking
Create a to-scale prototype in the correct finish and finalise your design.
-
Completion
Finalise all the paperwork and files. Support your client and other third party companies with the correct information, files and support.
- Ensure the manufacturer or printer is completing the job (e.g.: by signing off a test print)
- Save all files into correct folders. Store the files.
- Finalise all invoicing and payments.
- Supply your client with all the correct files and instructions.
- Write a completion report
Other Useful Resources
Quicksprout’s How To Define Your Target Audience
The 7 Steps of a Professional Design Process by DesignCrowd
Inspirationfeed’s 7 Design Process Steps Designers Should Follow


![The concept was used on the German side as well with this 'Auch du sollst beitreten zur Reichswehr' [You too should join the German Army], design by Julius Engelhard, Image: courtesy of mental_floss](https://classoffederico.files.wordpress.com/2014/04/world-war-propaganda_auch-du-sollst-beitreten.jpg?w=251&resize=251%2C321#038;h=321 "world war propaganda_Auch du sollst beitreten")


